devopsy

biopsy : biology :: devopsy :: devops

Is 118 Equal to 90, 810, or 8A?

I’m not a mathematician (if you are, please send some tips to improve this post), but I saw an interesting math problem going around the internet and I felt like posting my solution. This the the problem as I first saw it:

If 111 = 13; 112 = 24; 113 = 35; 114 = 46; 115 = 57; Then 117 = ????

Everyone seems to have solved this problem looking for a function that relates the two numbers. I actually tried to solve the problem assuming the numbers were actually equal to each other (more on that later), but most people seem to have solved for a function that relates the numbers. Let’s try looking for a function first.

A simple solution

If you’re looking for a simple pattern, you may notice the numbers on the left are increasing in increments of one, and the numbers on the right by increments of 11. Mind the gap, though, we’re solving for 117 instead of 116. Following this pattern we’ve increased by 2 on the left and should therefore add 22 on the right. So the answer is 79.

This is just a simple linear regression, so you can solve it to find a formula you can use for any number:

“Restated problem”
1
2
3
4
5
6
7
y = a + bx
13 = a + 11(111)
13 = a + 1221
13 - 1221 = a
a = 1208

y = 11x - 1208

There you go, a simple formula that works for all our test cases, and we can easily plug in 12345 and find that the answer with this pattern would be 134587.

An alternative trick

Some people used an alternative pattern. They took the last digit from the right as the first digit on the left. The remaining digit(s) on the right are the some of the digits on the right. So for 113 the answer starts with 3 (the last number) and ends with 5 (the sum of 1, 1, and 3). Again, this matches all the test cases.

A different interpretation

I was trying to solve a different problem. I assumed the numbers were actually equal. Of course 111 is not equal to 13 in our familiar decimal numeral system, but programmers are used to working with alternative bases like binary or base 2, octal or base 8 and hexadecimal or base 16.

This is the pattern I found:

  1112 = 134 = 7
  1123 = 245 = 14
  1134 = 356 = 23
  1145 = 467 = 34
  1156 = 578 = 47

If you continue this pattern:

  1167 = 689 = 62
  1178 = 7910 = 79
  1189 = 8A11 = 98

(Note: Once you go past decimal, or base 10, the number system involves letters. So A is the “number” after 9.)

Comparison

I find it interesting that three pretty simple patterns all work for 7 straight test cases, even though my interpretation solved a different problem! However, they do begin diverging at 118.

x y (simple solution) y (composition) y (number systems) y (number systems in decimal)
116 68 68 689 62
117 79 79 7910 79
118 90 810 8A11 98

The way the problem is stated is not precise. The popular solutions assume there is an implicit function. The problem could be more precisely stated as:

“Problem restated as a formula”
1
2
3
4
5
6
7
8
9
10
Given:
  f(111) = 13
  f(112) = 24
  f(113) = 35
  f(114) = 46
  f(115) = 57

Find:
  f(x)
  f(117)

My solution assumes there are unknown implicit bases. I’m not exactly sure how to state that, but it’s something like this:

Given:
  111f(x) = 13g(x)
  112f(x) = 24g(x)
  113f(x) = 35g(x)
  114f(x) = 46g(x)
  115f(x) = 57g(x)

Find:
  f(x)
  g(x)
  f(117) and g(117)

I’m curious where this problem originated. Occam’s Razor suggests they had the simple solution in mind, but if the problem is really “for genuises”, then counting by 11 is a bit trivial. It’s too bad they didn’t ask about 118.If the problem was really “for genuises”, then it seems like there’d be a bit more to it than incrementing by 11. They should have asked about 118.

Octopress on Cloud9

This post was written, previewed, and published from http://c9.io/

I travel a lot, dual-boot, and own several computers. It can be painful to maintain and sync identical development environments on each machine. I have some projects that are okay to limit to one machine - but I should be able to blog from anywhere. This is actually a common reason I hear people choose WordPress over Octopress.

Cloud9 (http://c9.io/) is an online IDE. It’s matured quite a bit from when I first tried it. It will integrate seamlessly with your GitHub account, and has a terminal so you can run ruby, python and other applications. So, I decided I to try it as an IDE for my blog.

Getting started was painless. I just:

  • Signed in to http://c9.io/ with my GitHub account.
  • Used the “Clone to Edit” button on the GitHub project for my blog.
  • Hit “Start Editing” once it was done.

I could now edit posts on http://c9.io/ with Markdown syntax highlighting and interact directly with GitHub. I wanted a bit more, though. I wanted to preview my blog.

I made one very minor change to the Rakefile. I had to change:

Rakefile
1
2
3
4
5
6
7
8
9
10
11
12
13
14
15
16
17
18
 themes_dir      = ".themes"   # directory for blog files
 new_post_ext    = "markdown"  # default new post file extension when using the new_post task
 new_page_ext    = "markdown"  # default new page file extension when using the new_page task
-server_port     = "4000"      # port for preview server eg. localhost:4000
+server_host     = ENV['IP'] ||= '0.0.0.0'     # server bind address for preview server
+server_port     = ENV['PORT'] ||= "4000"      # port for preview server eg. localhost:4000


 desc "Initial setup for Octopress: copies the default theme into the path of Jekyll's generator. Rake install defaults to rake install[classic] to install a different theme run rake install[some_theme_name]"
@@ -78,7 +79,7 @@ task :preview do
   system "compass compile --css-dir #{source_dir}/stylesheets" unless File.exist?("#{source_dir}/stylesheets/screen.css")
   jekyllPid = Process.spawn({"OCTOPRESS_ENV"=>"preview"}, "jekyll --auto")
   compassPid = Process.spawn("compass watch")
-  rackupPid = Process.spawn("rackup --port #{server_port}")
+  rackupPid = Process.spawn("rackup --host #{server_host} --port #{server_port}")

   trap("INT") {
     [jekyllPid, compassPid, rackupPid].each { |pid| Process.kill(9, pid) rescue Errno::ESRCH }

I’ve sent a pull request. Hopefully this will work out-of-the-box with Octopress in the future.

Now, its easy to get your preview running. Just run:

1
2
bundle install
rake preview

Soon, your preview should be running at http://<projectname>.<username>.c9.io/. It’s public, so you could even run a few tools against it, like the W3C link checker.

Once you’re ready to post, just follow the normal instructions for deploying Octopress. In my case it was:

1
2
rake setup_github_pages
rake deploy

Conditional Traversals With Gremlin

The problem

I recently did a spike for CreditUnionFindr that used a graph to determine if the user is eligable for a credit union’s Credit Union Field of Membership. We tried a several approaches but settled on graph-based approach.

The concept was simple: if you can traverse from the user to a credit union, they are eligable. The majority of the Fields of Membership (FOMs) are simple, and a graph solution was trivial: Max works at ThoughtWorks which qualifies for TW Credit Union

However, some FOMs are more complex. We were concerned about Glass Ceilings so we needed to be sure our graph was flexible.

One problem we hit was conditional traversals. Occasionally we needed to do something like this: Max works at ThoughtWorks which qualifies for TW Credit Union if employment duration is greater than 1 year

I found a few examples of conditional traversals in graphs, but the traverser always knew the condition and often the depth where it occurred. If that was the case, we could use this naive solution for the above graph:

EligabilityGraph.groovy
1
2
3
4
def dumbSolve(Object id) {
    def results = g.v(id).outE.filter{it.duration > 365}.inV.outE.inV.paths {it.name} {it.description}
    solutions = results.toList()
}

This wouldn’t have worked well for us. If we had to know all the conditions (and depths) ahead of time our solution would not be as simple as we originally envisioned. We were looking for a simple traversal that could solve a more complex graph like this: 
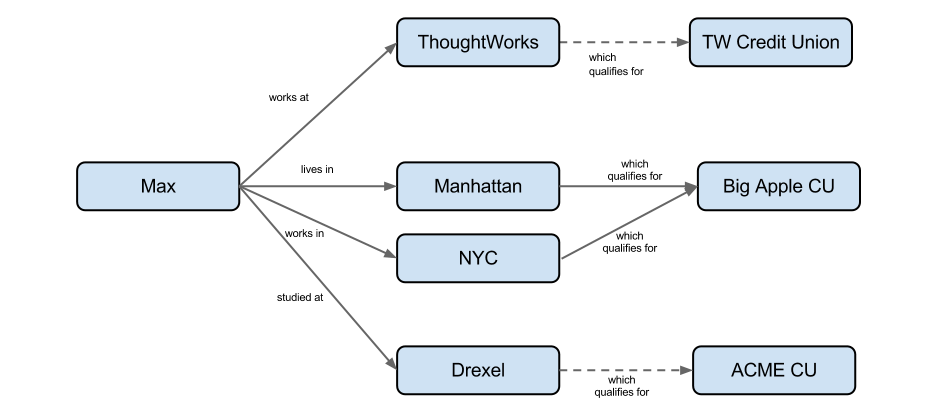
This graph contains two unconditional qualifications and two conditional qualifications. The two conditions (not shown) could be different.

The concept was still simple - traverse from the user to credit unions, avoiding nodes with false conditions. We needed the conditions to be closures to do this without overcomplicating our traversal.

Our solution

We came up with something like this:

EligibilityGraph.groovy
1
2
3
4
5
6
7
8
9
10
11
12
13
14
15
16
def solve(Object id) {
    def results =
//            Find the User node and save it as u
        g.v(id).as('u').sideEffect{u = it}
//            Save the edge before the condition as l
            .outE.sideEffect{l = it}
//            Save the edge to be filtered as x
            .inV.outE.sideEffect{x = it}
//            Filter based on the "condition" closure
            .filter {it.condition == null || this.evaluate("${it.condition}")}
//            Keep going until we find a Credit Union
            .inV.loop('u') {it.object.type != 'CU' && it.loops < 50}
//            Format our results
            .paths {it.name} {it.description}
    solutions = results.toList()
}

The example above is Gremlin Groovy. You do need a minor trick in Groovy. The class containing the solve method needs to be able to call evaluate with the current context. I accomplished this by extending GroovyShell.

You should be able to use this technique with various languages and databases by using the Rexster Gremlin Extension or the Neo4J Gremlin Plugin.

Sample Test

Graphs conveniently give us paths, so we can get information about the final result, or about the path to the result. In this case, we can easily turn the path into a human readable explanation of eligibility. Hopefully that makes the example test below easy to follow.

EligibilityGraph.groovy
1
2
3
4
5
6
7
8
9
List<String> getDisplayPaths() {
    if(solutions == null) throw new IllegalStateException("Solve first")
    solutions.collect{it.join(' ')}
}

List<String> getEligibleCUs() {
    if(solutions == null) throw new IllegalStateException("Solve first")
    solutions.collect{it[-1]}.unique()
}
ComplexGraphTest.groovy
1
2
3
4
5
6
7
8
9
10
11
void testMaxWrongDegree() {
        g.e('Max_Drexel').degree = 'BSCS'
        def results = eg.solve('Max')
        def paths = eg.getDisplayPaths()
        def creditUnions = eg.getEligibleCUs()
        assertTrue(paths.contains('Max works at ThoughtWorks which qualifies for TW Credit Union'))
        assertTrue(paths.contains('Max lives at NYC which qualifies for Big Apple Credit Union'))
        assertTrue(paths.contains('Max lives in Manhattan which qualifies for Big Apple Credit Union'))
        assertEquals(3, results.size)
        assertEquals(2, creditUnions.size)
    }

You can find the full code and more tests on GitHub

Summary

Someone asked “How much logic should we be putting into the queries we run through Gremlin?” in the Gremlin group and the consensus was “minimal”. This technique goes against that somewhat. On the other hand we’ve actually pushed most of the logic out of the traversal - we just moved the logic into the graph rather than the post-processing of results.

The best use cases for graphs called out in NoSQL Distilled are Social graphs; Routing, Dispatch and Location based services, and Recommendation engines. Our spike fell outside those categories, so the techniques that worked for us might not make sense for more typical graph projects.

Numeric Indexes and the Neo4J REST Server

Suppose your neo database contains suppliers for custom t-shirt printing. Some suppliers have a minimum order quantity, and you want to quickly lookup suppliers that would accept a given quantity. This is easy with the Embedded Neo4J server in Java:

1
2
3
4
5
6
7
8
9
10
11
12
13
  // Add to an index
  Index<Node> suppliers = graphDb.index().forNodes("suppliers");
  suppliers.add(someSupplier, "minimum-order", new ValueContext(5).indexNumeric());

  // Test query with a match
  QueryContext queryContext = QueryContext.numericRange("minimum-order", null, 8);
  IndexHits<Node> potentialSuppliers = suppliers.query(queryContext);
  assertEquals(1, potentialSuppliers.size());
  assertEquals(someSupplier, potentialSuppliers.getSingle());
  // Test query without a match
  queryContext = QueryContext.numericRange("minimum-order", null, 4);
  potentialSuppliers = suppliers.query(queryContext);
  assertEquals(0, potentialSuppliers.size());

However, those numeric ranges are not supported by Neo4J REST server. It’s probably best to write a plugin for this, but if you cannot use custom plugins (for example, I don’t think the Heroku Neo4J Add-On allows custom plugins) then the Neo4J Gremlin Plugin may be your best choice.

Here’s how you would do the same thing if you’re using Ruby’s Neography:

1
2
3
4
5
6
7
8
9
10
11
12
13
14
15
16
17
18
19
20
21
22
23
24
25
26
27
28
29
30
31
32
33
34
35
36
37
38
39
40
41
42
43
44
45
46
47
48
class NeoQuery
  GREMLIN_NUMERIC_INDEX_TEMPLATE = <<eos
    import org.neo4j.index.lucene.*;
    neo4j = g.getRawGraph();
    tx = neo4j.beginTx();
    idxManager = neo4j.index();
    cuIndex = idxManager.forNodes(index_name);
    node = neo4j.getNodeById(Long.parseLong(node_id));
    cuIndex.add(node, key_name, new ValueContext(value).indexNumeric());
    tx.success();
    tx.finish();
eos

  GREMLIN_NUMERIC_QUERY_TEMPLATE = <<eos
    import org.neo4j.index.lucene.*;
    neo4j = g.getRawGraph();
    idxManager = neo4j.index();
    cuIndex = idxManager.forNodes(index_name);
    cuIndex.query(QueryContext.numericRange(key_name, null, value, false, false));
eos

  @@neo = Neography::Rest.new(ENV["NEO4J_URL"] || "http://localhost:7474")

  def self.index_numeric(index_name, node, key_name, value)
    @@neo.execute_script(GREMLIN_NUMERIC_INDEX_TEMPLATE, {
      :index_name => index_name,
      :key_name => key_name,
      :node_id => node,
      :value => value})
  end

  def self.query_numeric(index_name, key_name, value)
    @@neo.execute_script(GREMLIN_NUMERIC_QUERY_TEMPLATE, {
      :index_name => index_name,
      :key_name => key_name,
      :value => value})
  end
end

# Add to index
NeoQuery.index_numeric('suppliers', your_node.neo_id, :minimum_order_size, 5)
# Test query with a match
potential_suppliers = NeoQuery.query_numeric('suppliers', :minimum_order_size, 8)
potential_suppliers.size.should == 1
Neography::Node.load(potential_suppliers[0]).neo_id.should == your_node.neo_id
# Test query without a match
potential_suppliers = NeoQuery.query_numeric('suppliers', :minimum_order_size, 4)
potential_suppliers.size.should == 0

Disclaimer: I have not tested behavior in a clustered environment and you should consider security before using execute_script.

Commit Often - and Update Your Dependencies!

How often do you commit your changes? How often do you upgrade your dependencies?

Commit Often

There is a common answer to the first question:

Everyone Commits To the Mainline Every Day

Code is integrated and tested after a few hours-a day of development at most.

Kent Beck Extreme Programming Explained

We recommend that you aim to commit changes to the version control system at the conclusion of each separate incremental change or refactoring. If you use this technique correctly, you should be checking in at the very minimum once a day, and more usually several times a day.

Jez Humble and David Farley Continuous Delivery

This makes sense: small frequent merges are easier to integrate than large, occasional ones. The less often you commit (to a shared “trunk” branch) the more painful integration becomes. You find problems too late, and spend a lot of time in integration or merge hell: performing painful merges or grepping through large changesets to find the needle in the haystack that broke the app.

Upgrade Often

The same logic applies to upgrading dependencies. If you upgrade frequently, each individual upgrade is usually quick and painless. Yet there is less consensus about how often to upgrade.

I’m a fan of small, frequent upgades. I consider any outdated library to be tech debt. You don’t always need to address it right away but you should review it and make an informed decision. This is the difference between Reckless/Inadvertant debt and Prudent/Deliberate debt.

I’m not a fan of Long-Term Support (LTS) releases either. It means you’re setup up for a major upgrade, you’re missing out on faster/safer/cooler software. Your environment probably isn’t as static as you pretend either - why would you use a locked version of Selenium/WebDriver unless you’ve turned off Firefox/Chrome updates.

Uninformed Pessimism

Can a team simultaneously be “bleeding edge” and a “late adopter”?

I’ve seen it. I was on a team that had used an a beta release of a library, then skipped the next few stable releases. When we finally upgraded a method was missing. I dug through the release notes for several versions, looking for a deprecation notice with a recommended alternative. I never found one - because the method never made it out of the beta!

The team did not choose to do this - they were simple uninformed. They’d been inadvertently reckless. This is a trap you can fall in even if you don’t use beta versions. If you don’t have a good dependency report that shows what you’re using and what upgrades are available then you are uninformed. You could try to manually assemble a report, but that is impractical on large projects (most Java projects), or projects with lots of small, frequently released libraries (most Ruby projects).

Informed Pessimism

The first step towards better dependency management is becoming is “Informed Pessimism”: generate and regularly review a report of available upgrades. Many package managers have a report or command you can use:

Bundler usually beats Maven, but in this case the Maven plugin generates a nice report I can display from a CI server. Here’s a live examle.

Cautious Optimism

Alex Chaffee proposed Cautious Optimism as the ideal. A Cautious Optimism build system will attempt to upgrade dependencies as soon as possible.

Cautious Optimism isn’t for everyone, but if you have good dependency management and a Continuous Delivery setup you can trust your pipeline to catch problems introduced by an upgrade. If a problem is found, you lock the dependency to the last-known good version until a solution is found. Some tools that are useful in implementing Cautious Optimism:

Matrix Builds

If your team can release frequently it can probably upgrade frequently. The only exceptions may be upgrades to large frameworks - Java/Spring, Ruby/Rails, etc. It may be prudent to delay an upgrade even if its possible - just because it means a long downloads and a lot of knew features to study.

It is possible to get the feedback without actually committing to an upgrade. I view this as using your CI/CD setup to answer two questions:

  • Is the app releasable? (Test with fixed dependencies)
  • Is the app upgradable? (Test with latest dependencies)

I’d probably do the upgradable check less often. The releasabilty checks should be every commit, but you can probably check for upgradability nightly.

Conclusion

Most Agile teams believe in the “commit often” motto. You should remember that everyone is supposed to commit often. Unless everyone has integrated recently, someone on the team may still be headed towards merge hell.

I consider third-party library developers to be part of the extended team. Unfortunately these developers cannot push their own changes and cannot resolve the conflicts. The core team needs to be proactive about reviewing and pulling upgrades as often as practical. Every day may not be practical, but try to avoid skipping releases.

Continuous Deployment to Heroku With Jenkins

Heroku is an easy way to host your apps. It is simple and runs in the cloud - so you avoid the need for servers and a lot of infrastructure automation scripting. Unfortunately, there aren’t many good Continuous Integration or Continuous Delivery options that can run on Heroku12, so if you’re a firm believer in CI/CD you will still need some servers outside of Heroku.

So, how do you add Heroku deployments into you pipeline if you are running a CI server outside heroku? This Jenkins setup is working for me:

Heroku Setup

If you don’t already have multiple environments in Heroku, you’ll need to set that up. Check out the Heroku guide on Managing Multiple Environments for an App.

tl;dr: Heroku environments are really distinct apps. They each have their own set of plugins and collaborators, so make two apps with the same plugins. I wouldn’t share the collaborators - the team can push to CI, but only CI should push to production.

Here’s an sample of a two-environment setup:

Heroku setup
1
2
heroku create --stack cedar --addons scheduler your-app
heroku create --stack cedar --addons scheduler --remote production your-app-prod

Jenkins Setup

Here’s what you need to do on the Jenkins side:

Plugins

Install Jenkins GIT plugin

Create the Post Deploy Job

Create a new job named your-app-postdeploy. It should run whatever is necessary to complete a deployment after a git push to Heroku. Probably something along the lines of:

Jenkins Execute shell Setting
1
heroku rake db:migrate db:seed --app your-app-prod

Setup both Git repos as SCMs

Git Repositories Repository URL git@heroku.com:your-app.git Repository URL git@heroku.com:your-app-prod.git Name production Branches to build Branch Specifier (blank for default):

Setup the build

Setup whatever your CI would normally do if you weren’t using Heroku environments. If your CI tests include an integration phase that hits http://your-app.heroku.com then you should probably include the same steps as your post-deploy job (with –app your-app).

Setup the merge and push

Git Publisher Push Only If Build Succeeds true Merge Results true Branches Branch to push master Target remote name production

Setup the post-deploy trigger

Build other projects Projects to build your-app-postdeploy Trigger only if build succeeds

Summary

This should get you Continuous Deployment from Jenkins to Heroku. There are a couple caveats:

  • You may get a merge conflict if someone manually pushes changes to production that were not pushed through your-app/master. You shouldn’t do that anyways.
  • This is Continuous Deployment, not Continuous Delivery. You would need to make some changes to support a manual gate before production. The only opportunity this provides for a manual gate (between deployment and post-deployment) is not a viable option.
  • Your application may be broken between the deploy and post-deploy. This is usually just a few seconds. You could briefly enable Heroku maintenance mode if the user experience is an issue.

Footnotes

Footnotes:
  1. <a href='#fnref:1' rev='footnote'>↩</a>
    

Setting Up Ssh Known Hosts via Capistrano

Puppet and Chef are both good at managing SSH known_hosts. This is the primary example for Puppet’s Exported Resources, and Chef does it easily via search.

However, neither solution works well in a “masterless” setup. The Chef solution requires a full Chef Server setup - CouchDB, AMQP, and Solr. Puppet isn’t quite as bad - you just need a database to run masterless and still use Exported Resources - like Loggly does. This negates some of the masterless benefits, though, and Loggly lists lots of caveats.

If you happen to be using Capistrano for any part of your project, here is a fast, simple way to manage known_hosts without requiring a database.

1
2
3
4
5
task :setup_known_hosts do
        find_servers.each do |h|
          run "#{sudo} bash -c 'ssh-keyscan -t rsa #{h} >> /etc/ssh/ssh_known_hosts'"
        end
end

Usage is simple, just:

1
cap setup_known_hosts

or

1
cap setup_known_hosts HOSTS=<your_hosts>

This was a good fit for us. We were using Capistrano for bootstrapping, and Capistrano Multistage Extension to define environments. I just added this task as part of bootstrapping, so cap production bootstrap would allow all my production servers to talk with each other - but no one else.

Launched!

I’m finally getting a blog started. I’m dual booting Windows and Ubuntu, and had to fix rubypython on Windows (so Octopress can use Pygments for syntax highlighting). I took this pull request and modified it slightly to work with newer Python installers.

This is how I fixed syntax highlighting lib/rubypython/pythonexec.rb
1
2
3
4
5
6
7
8
9
10
11
12
13
14
15
16
17
if FFI::Platform.windows?
  # Do this after trying to add alternative extensions, 
  # since windows install has a python27.a and can cause 
  # troble.
  #
  # Some Windows python installers install the DLL in the python directory
  # others install in the Windows system directory.  So we should search both.
  path = File.dirname(@python)
  windir = ENV['WINDIR']
  # Windows Python doesn't like ' with inner " so we have to switch it around. 
  winversion = %x(#{@python} -c "import sys; print '%d%d' % sys.version_info[:2]").chomp
  dll = "python#{winversion}.dll"
  locations << File.join(windir, "System32", dll)
  locations << File.join(windir, "SysWOW64", dll)
  locations << File.join(path, dll)
  locations << File.join(path, "libs", dll)
end